Adding Project Nature Programmatically in Eclipse
In this post we are going to see how can we add a custom project nature programmatically.
I found a nice post
which precisely tells us how should we create a java project programmatically. Now what if I want to have a custom project nature for my project?
Every project created inside eclipse will be associated with natures.
You can find this in the .project file. An example is shown below.

Now in sometimes , we may require to add custom nature to our project. The extension point org.eclipse.core.resources.natures helps us to do that.
Add org.eclipse.core.resources as a dependency in plugin.xml.
Then add org.eclipse.core.resources.natures extension point. It may look like below
<extension
         id="myplugin.myprojnature"
         point="org.eclipse.core.resources.natures">
      <runtime>
         <run
               class="myplugin.MyProjNature">
         </run>
      </runtime>
 </extension>
Now , create a MyProjNature class which implements IProjectNature interface.
public class MyProjNature implements IProjectNature {

	public static final String NATURE_ID = "com.mycomp.myproject.myprojnature";

	@Override
	public void configure() throws CoreException {
		// TODO Auto-generated method stub

	}

	@Override
	public void deconfigure() throws CoreException {
		// TODO Auto-generated method stub

	}

	@Override
	public IProject getProject() {
		// TODO Auto-generated method stub
		return null;
	}

	@Override
	public void setProject(IProject arg0) {
		// TODO Auto-generated method stub

	}

}
The below piece of code will do the job of adding the custom nature,
             try {
			IProjectDescription desc = myProj.getDescription();
			String[] prevNatures = desc.getNatureIds();
			String[] newNatures = new String[prevNatures.length + 1];
			System.arraycopy(prevNatures, 0, newNatures, 0, prevNatures.length);
			newNatures[prevNatures.length] = MyProjNature.NATURE_ID;
			desc.setNatureIds(newNatures);
			myProj.setDescription(desc, new NullProgessMonitor());
		} catch (CoreException e) {
			e.printStackTrace();
		}
That’s it. Hope this is helpful.
Happy coding. 🙂
Scheduled Notifications in Eclipse RCP Applications
As a busy developers we tend to miss little things day to day, forget to filing out effort sheet is one great example 😉 😛 , So for these reminders/notifications are helpful.
Mylyn notifications is a really good solution for including notifications in RCP applications.
Now in realtime most of us would need a scheduled notifications, Lately for a POC I did we were in a need of such a scheduled notification for the RCP app. In this post we are going to see how can we schedule notifications using ‘quartz job’.
As a regular news reader , I use to check google news after my lunch almost everyday. Lets schedule a notification at 13:30 everyday to say “News time” . So our notification will be having a link to news.google.com. 🙂
In your plug-in project add “org.eclipse.mylyn.commons.ui“ as a dependency. Now to create the notification popup , create a class called NotificationPopUI and extend “org.eclipse.mylyn.internal.provisional.commons.ui.AbstractNotificationPopup” class.
import java.net.MalformedURLException;
import java.net.URL;
import org.eclipse.mylyn.internal.provisional.commons.ui.AbstractNotificationPopup;
import org.eclipse.mylyn.internal.provisional.commons.ui.CommonFonts;
import org.eclipse.mylyn.internal.provisional.commons.ui.CommonImages;
import org.eclipse.swt.events.MouseAdapter;
import org.eclipse.swt.events.MouseEvent;
import org.eclipse.swt.events.MouseTrackAdapter;
import org.eclipse.swt.events.SelectionAdapter;
import org.eclipse.swt.events.SelectionEvent;
import org.eclipse.swt.graphics.Image;
import org.eclipse.swt.layout.GridData;
import org.eclipse.swt.layout.GridLayout;
import org.eclipse.swt.widgets.Composite;
import org.eclipse.swt.widgets.Display;
import org.eclipse.swt.widgets.Label;
import org.eclipse.swt.widgets.Link;
import org.eclipse.ui.IWorkbench;
import org.eclipse.ui.PartInitException;
import org.eclipse.ui.PlatformUI;
import org.eclipse.ui.browser.IWebBrowser;
import org.eclipse.ui.browser.IWorkbenchBrowserSupport;

@SuppressWarnings("restriction")
public class NotificationPopUpUI extends AbstractNotificationPopup
{

  @SuppressWarnings("restriction")
public NotificationPopUpUI(Display display)
  {
    super(display);
  }

  @Override
  protected void createContentArea(Composite composite)
  {
    composite.setLayout(new GridLayout(1, true));
    Link linkGoogleNews = new Link(composite, 0);
    String googlenewsLink = "This is a link to <a href=\"https://news.google.com\">Google News</a>";
    linkGoogleNews.setText(googlenewsLink);
    linkGoogleNews.setSize(400, 100);

    linkGoogleNews.addSelectionListener(new SelectionAdapter()
    {
      public void widgetSelected(SelectionEvent e) {
        try {
          PlatformUI.getWorkbench().getBrowserSupport()
            .getExternalBrowser().openURL(new URL(e.text));
        } catch (PartInitException e1) {
          e1.printStackTrace();
        } catch (MalformedURLException e1) {
          e1.printStackTrace();
        }
      }
    });
  }


  @Override
  protected String getPopupShellTitle()
  {
    return "It's News Time!";
  }

  @Override
  protected Image getPopupShellImage(int maximumHeight)
  {
    return null;
  }
}
The method protected void createContentArea(Composite composite){} should be overrided to add the content which we want to display.
If we want to customize the title area also, then we should consider overriding
protected void createTitleArea(Composite parent){}.
Now we are done with creating the content of our notification popup , we need two other things to get this whole thing done.
1. A Quartz Job class where we will invoke the notification popup.
2. A place where we will be triggering/scheduling the quartz job.
Task#1 – Invoking the notification
Create a class called InvokeNotificationJob which implements org.quartz.Job interface.
import org.eclipse.swt.widgets.Display;
import org.quartz.Job;
import org.quartz.JobExecutionContext;
import org.quartz.JobExecutionException;

public class InvokeNotificationJob
  implements Job
{
  public void execute(JobExecutionContext context)
    throws JobExecutionException
  {
    Runnable runnable = new Runnable()
    {
      public void run()
      {
        NotificationPopUpUI popup = new  NotificationPopUpUI(NotificationQuartzJobHelper.getInstance().getCurrentDisp());
        popup.open();
      }
    };
    NotificationQuartzJobHelper.getInstance().getCurrentDisp().syncExec(runnable);
  }
}
As you could see from the above code I am using a helper class, I will explain the use of it little later when we accomplish our task#2.
Note :
With the invocation shown by default the notification will fadeout after certain delay. If in case you do not need the fadeout (forcing the notification to stay until it get closed) we have to set ,
popup.setFadingEnabled(false);
popup.setDelayClose(0L);
Task#2 – Scheduling the notification job
We are not going to have any dedicated action for this triggering, so we are going to make use of startup extension point.
Create a class called StartUpClass which implements org.eclipse.ui.IStartup interface.
The method public void earlyStartup() will be called when the plugin is activated.
import org.eclipse.ui.IStartup;
import org.eclipse.ui.IWorkbench;
import org.eclipse.ui.PlatformUI;
import org.quartz.CronExpression;
import org.quartz.CronTrigger;
import org.quartz.JobDetail;
import org.quartz.Scheduler;
import org.quartz.SchedulerException;
import org.quartz.SchedulerFactory;
import org.quartz.impl.StdSchedulerFactory;

public class StartUpClass
  implements IStartup
{
  public void earlyStartup()
  {
    if (PlatformUI.isWorkbenchRunning())
     NotificationQuartzJobHelper.getInstance().
       setCurrDisplay(PlatformUI.getWorkbench().getDisplay());
    try
    {
      scheduleNotification();
    } catch (SchedulerException e) {
      e.printStackTrace();
    }
  }

  public void scheduleNotification()
    throws SchedulerException
  {
    SchedulerFactory schedulerFactory = new StdSchedulerFactory();

    Scheduler scheduler = schedulerFactory.getScheduler();


    JobDetail jobDetail = new JobDetail("jobDetail", "jobDetailGroup", InvokeNotificationJob.class);

    CronTrigger cronTrigger = new CronTrigger("cronTrigger", "triggerGroup");
    try
    {
      CronExpression cexp = new CronExpression("0 30 13 ? 1-12 ?");

      cronTrigger.setCronExpression(cexp);
    }
    catch (Exception e)
    {
      e.printStackTrace();
    }

    scheduler.scheduleJob(jobDetail, cronTrigger);

    scheduler.start();
  }
}
There are two things which u could notice here ,
First a helper class is being used to set the current display , which is being used in task#1 code.
Why we need this Display is as notification popup class involves UI stuff we have to do the invoking inside Display thread and since we are using another runnable there what I found it if we use “Display.getDefault()” directly then it will be null . So at the startup we are setting up the Current display and make use of it when we need. There are always better way to do this , but as of now I am going to stick with this.
Now the helper class looks like this ,
import org.eclipse.swt.widgets.Display;

public class NotificationQuartzJobHelper
{
  private static NotificationQuartzJobHelper notificationQuartzJobHelper;
  private Display currentDisp;

  public static NotificationQuartzJobHelper getInstance()
  {
    if (notificationQuartzJobHelper == null) {
      notificationQuartzJobHelper = new NotificationQuartzJobHelper();
    }
    return notificationQuartzJobHelper;
  }

  public void setCurrDisplay(Display currentDisp)
  {
    this.currentDisp = currentDisp;
  }

  public Display getCurrentDisp()
  {
    return this.currentDisp;
  }
}
Second is the scheduleNotification() method on which we are actually performing the scheduling logic.
We are making use of CronExpression to schedule the notification as we needed , the little screenshot below explains the cron expression.

To see a detailed link how to use quartz job and cron expressions click here.
If you run the plugin you could see a notification at the scheduled time as shown below,

Imp Tip: To just test the notification popup , you could invoke it via any one of the view class or actions.
That’s it we are done here.
I hope this is useful.
Happy coding. 🙂
Inline Validations in Eclipse RCP – Field Assists
Inline validations has been there quite a while now , and in eclipse rcp applications too we can achieve that using control decorators.
What are we going to see in this post is a control decoration , which helps to notify the user if somethings goes wrong when some action is triggered on a control.
Let us consider a real time example , let us take a pincode text field.
If an user is typing in a non-numeric field , then an error icon should be shown to the user.
Let us create a text field on which we ll be adding the decoration.
Label label = new Label(parent, SWT.NONE);
label.setText("Please Enter Pincode:");
label.setLayoutData(new GridData(SWT.FILL, SWT.FILL, false, false));

Text  txtPincode = new Text(parent , SWT.NONE);
txtPincode.setLayoutData(new GridData(SWT.FILL, SWT.FILL, false, false));

//Adding the decorator
final ControlDecoration txtDecorator = new ControlDecoration(txtPincode, SWT.TOP|SWT.RIGHT);
FieldDecoration fieldDecoration = FieldDecorationRegistry.getDefault().getFieldDecoration(FieldDecorationRegistry .DEC_ERROR);
Image img = fieldDecoration.getImage();
txtDecorator.setImage(img);
txtDecorator.setDescriptionText("Pls enter only numeric fields");
// hiding it initially
txtDecorator.hide();

txtPincode.addKeyListener(new KeyAdapter() {

  @Override
 public void keyReleased(KeyEvent e) {
     Text text = (Text)e.getSource();
     String string = text.getText();
     char[] chars = new char[string.length()];
     string.getChars(0, chars.length, chars, 0);
      for (int i = 0; i < chars.length; i++)
        {
            if (!('0' <= chars[i] && chars[i] <= '9'))
            {
           	txtDecorator.show();
            }
            else
            {
            	txtDecorator.hide();
            }

        }

}
});
Sample screenshot:

On a short note just giving a quick reference for decorators here.
Decorators are often used for other purposes with views also.
The above reference link and this eclipse article will help you cover that.
Happy coding… 🙂
Eclipse RCP Preferences – Storing & Retrieving values using preferences
Often in the IDE development, we require to store some application specific values. We can make use of eclipse preferences to store and retrieve values.
The Eclipse has three different types of scopes.
Configuration scope
Default scope
Instance scope
The below code snippet shows how we can store and retrieve values using configuration scope:
Preferences preferences = ConfigurationScope.INSTANCE.getNode("com.mycomp.client");
Preferences pref = preferences.node("node1");
pref.put("key", "val");
 try
  {
  // Forcing the application to save the preferences
  preferences.flush();
  }
  catch (BackingStoreException e)
  {
    e.printStackTrace();
  }
Retrieving the stored value:
 Preferences preferences = ConfigurationScope.INSTANCE.getNode("com.mycomp.client");
 Preferences pref  = preferences.node("node1");
 String val = pref.get("key", "default");
For further reference you can refer here
Note: Preferences are workspace specific. So If the workspace is changed or deleted then the stored values will be lost.
Happy coding.. 🙂
Eclipse RCP – AutoCompleteCombo/Text control
In the recent project there was a requirement from the client where they want some sort of filtering in the drop down combo box as they felt its really difficult to choose from the combo if they have lots of items to choose.
So , we decided to work on that , and we found content proposal will be a good idea to get rid of this.
Here I am sharing the code snippet using that we can enable content proposals for combo and text controls.
import org.eclipse.jface.bindings.keys.KeyStroke;
import org.eclipse.jface.fieldassist.ComboContentAdapter;
import org.eclipse.jface.fieldassist.ContentProposalAdapter;
import org.eclipse.jface.fieldassist.SimpleContentProposalProvider;
import org.eclipse.jface.fieldassist.TextContentAdapter;
import org.eclipse.swt.SWT;
import org.eclipse.swt.events.SelectionAdapter;
import org.eclipse.swt.events.SelectionEvent;
import org.eclipse.swt.graphics.Rectangle;
import org.eclipse.swt.layout.GridData;
import org.eclipse.swt.layout.GridLayout;
import org.eclipse.swt.widgets.Combo;
import org.eclipse.swt.widgets.Control;
import org.eclipse.swt.widgets.Display;
import org.eclipse.swt.widgets.Monitor;
import org.eclipse.swt.widgets.Shell;
import org.eclipse.swt.widgets.Text;

public class AutoCompleteComboTextControls {

	private static final String LCL = "abcdefghijklmnopqrstuvwxyz";
	private static final String UCL = LCL.toUpperCase();
	private static final String NUMS = "0123456789";
	private static final String[] items = new String[] { "Alpha", "Beta", "gaama", "pie",
		"alge","bata" };


	public static void main(String[] args) {
		Display display = new Display();
		Shell shell = new Shell(display);
		shell.setLayout(new GridLayout(1, false));
		shell.setLayoutData(new GridData(SWT.FILL, SWT.FILL, true, false));
		shell.setSize(200, 200);
		shell.setText("Auto Complete Controls");

		Monitor primaryMonitor = display.getPrimaryMonitor ();
		Rectangle bounds = primaryMonitor.getBounds ();
		Rectangle rect = shell.getBounds ();
		int x = bounds.x + (bounds.width - rect.width) / 2 ;
		int y = bounds.y + (bounds.height - rect.height) / 2 ;
		shell.setLocation (x, y);

		Combo combo = new Combo(shell, SWT.NONE);
		combo.setItems(items);
		combo.setLayoutData(new GridData(SWT.FILL, SWT.FILL, true, false));

		combo.addSelectionListener(new SelectionAdapter() {

			// called for keyboard enter press
			@Override
			public void widgetDefaultSelected(SelectionEvent e) {
			}

			@Override
			public void widgetSelected(SelectionEvent e) {
			}
		});

//		Have a look at Jface AutoCompleteField class also
		enableContentProposal(combo);

		Text text = new Text(shell, SWT.BORDER);
		text.setLayoutData(new GridData(SWT.FILL, SWT.FILL, true, false));
		enableContentProposal(text);

		shell.open();
		while (!shell.isDisposed()) {
			if (!display.readAndDispatch())
				display.sleep();
		}
		display.dispose();
	}

	static  void enableContentProposal(Control control)
	    {

	        SimpleContentProposalProvider proposalProvider = null;
	        ContentProposalAdapter proposalAdapter = null;
	        if (control instanceof Combo)
	        {
	            Combo combo = (Combo) control;
	            proposalProvider = new SimpleContentProposalProvider(combo.getItems());
	            proposalAdapter = new ContentProposalAdapter(
	                combo,
	                new ComboContentAdapter(),
	                proposalProvider,
	                getActivationKeystroke(),
	                getAutoactivationChars());
	        }
	        else if (control instanceof Text)
	        {

	            Text text = (Text) control;
	            proposalProvider = new SimpleContentProposalProvider(items);
	            proposalAdapter = new ContentProposalAdapter(
	                text,
	                new TextContentAdapter(),
	                proposalProvider,
	                getActivationKeystroke(),
	                getAutoactivationChars());
	        }
	        proposalProvider.setFiltering(true);
	        proposalAdapter.setPropagateKeys(true);
	        proposalAdapter.setProposalAcceptanceStyle(ContentProposalAdapter.PROPOSAL_REPLACE);

	    }


	// this logic is  from swt addons project
	 static char[] getAutoactivationChars() {

		// To enable content proposal on deleting a char

		String delete = new String(new char[] { 8 });
		String allChars = LCL + UCL + NUMS + delete;
		return allChars.toCharArray();
	}

	 static KeyStroke getActivationKeystroke() {
		KeyStroke instance = KeyStroke.getInstance(
				new Integer(SWT.CTRL).intValue(), new Integer(' ').intValue());
		return instance;
	}

}
As the content proposal adapter of the jface does not handle the deletion of char, we have to add it in our logic which you can see in getAutoactivationChars() method. This logic is from SWT Addons project .Have a look into SWT Add-ons project.
Note: One annoying thing which I found while implementing this is , after selecting any items from the list via enter press in the keyboard. The control is jus transferred from the content dialog to the combo or text. So if you are handling anything on enter key press for combo or text then user may have to press the enter button twice.
I Hope this is useful.
Happy coding… 🙂
Eclipse RCP – Placing shell/dialog in the center or near cursor position
One of the common requirement in day to day rcp development is to place the dialogs/shells we show in the center of the screen or near to the cursor position.
The following snippet will help you for the same.
Placing at the center of the screen:
Monitor primaryMonitor = display.getPrimaryMonitor ();
Rectangle bounds = primaryMonitor.getBounds ();
Rectangle rect = shell.getBounds ();
int x = bounds.x + (bounds.width - rect.width) / 2 ;
int y = bounds.y + (bounds.height - rect.height) / 2 ;
shell.setLocation (x, y);
Placing the shell near cursor:
Point pt = display.getCursorLocation();
 shell.setLocation(pt.x, pt.y);
Happy coding.. 🙂
JFace Wizard Explained – Enabling/Disabling Next, finish buttons
This post assumes the reader has basic knowledge about creating jface wizards. To know about the basics refer here.
One of the most used member of the jface is the wizard. Almost in every rcp application this is used. I have quite a experience in wizard and I would like to post this for easy understanding for the people who are new to jface wizard.
As you might know wizard is commonly used for sequence of operations which require more than one input followed by their processing and finishing the process with the processed input.
Please refer the flow chart below for the initial flow of wizard and wizard page creations.

One of the important thing which is in programmer’s control in wizard is the enabling/disabling of the buttons (back, next & finish) in the wizard.
As from the flow chart you can see when the wizard is created the wizard’s canFinish() method is called . if it is returning ‘false’ then finish button will be disabled else willl be enabled.
If we are not overriding the canFinish() method then by default the finish button will be enabled.
In most of the cases we should disable the finish button at the start and enable the next button for the current page based on some user selection.
Wizard provides an API to enable/disable finish button based on programmer’s preference.
‘setPageComplete(boolean) ‘ if it is set to true the finish get enabled disabled otherwise.
So , calling setPageComplete(false) in the wizard page(s) constructor will make the finish button to be disabled at the beginning of the wizard.
In the process of wizard user have to enable/disable “Next button alone” , so overriding canFlipToNextPage() in the wizard page will help us to do the same. One important thing we have to note here is programmer has to explicitly call the “getWizard().getContainer().updateButtons()” to update the buttons.
Please refer to the below flow chart for updateButtons() actions. For better reading I have splitted the actions which is taking place in updateButtons() method in to two process.

Note: setPageComplete(Boolean) internally again calls the canFinish() method of the wizard . so if overided it is programmer’s responsibility to retrun true/false.
I am attaching sample code below.
Wizard Class:
import org.eclipse.jface.wizard.Wizard;

public class MyWizard extends Wizard {

FirstPage firstPage = null;
 SecondPage secondPage = null;

public MyWizard() {
 super();
 }

public void addPages()
 {
 firstPage = new FirstPage("First Page");
 addPage(firstPage);

secondPage = new SecondPage("secondpage");
 addPage(secondPage);
 }

/*
 * (non-Javadoc)
 * @see org.eclipse.jface.wizard.Wizard#performFinish()
 *
 * Varies according to user needs...
 */
 @Override
 public boolean performFinish() {
 return firstPage.isPageComplete() && secondPage.isPageComplete();
 }

}
Wizard Pages:
import org.eclipse.jface.viewers.ArrayContentProvider;
import org.eclipse.jface.viewers.CheckStateChangedEvent;
import org.eclipse.jface.viewers.CheckboxTableViewer;
import org.eclipse.jface.viewers.ICheckStateListener;
import org.eclipse.jface.viewers.ILabelProviderListener;
import org.eclipse.jface.viewers.ITableLabelProvider;
import org.eclipse.jface.wizard.IWizardPage;
import org.eclipse.jface.wizard.WizardPage;
import org.eclipse.swt.SWT;
import org.eclipse.swt.graphics.Image;
import org.eclipse.swt.layout.GridData;
import org.eclipse.swt.layout.GridLayout;
import org.eclipse.swt.widgets.Composite;

public class FirstPage extends WizardPage {

private CheckboxTableViewer checkboxTableViewer;
private boolean enableNext;

protected FirstPage(String pageName) {
super(pageName);
setTitle(pageName);
//        this is doing the trick
setPageComplete(false);
}

@Override
public void createControl(Composite arg0) {

Composite container = new Composite(arg0,SWT.NONE);
container.setLayout(new GridLayout());
container.setLayoutData(new GridData(SWT.FILL,SWT.FILL,true,true));

checkboxTableViewer = CheckboxTableViewer.newCheckList(container, SWT.FULL_SELECTION|SWT.BORDER);
checkboxTableViewer.getTable().setLinesVisible(true);
checkboxTableViewer.setContentProvider(new ArrayContentProvider());
checkboxTableViewer.setLabelProvider(new ITableLabelProvider() {

@Override
public void removeListener(ILabelProviderListener arg0) {

}

@Override
public boolean isLabelProperty(Object arg0, String arg1) {
return false;
}

@Override
public void dispose() {

}

@Override
public void addListener(ILabelProviderListener arg0) {

}

@Override
public String getColumnText(Object element, int columnIndex) {
return element.toString();
}

@Override
public Image getColumnImage(Object element, int columnIndex) {
return null;
}
});

checkboxTableViewer.setInput(new String[] {"one ","two","three"});

checkboxTableViewer.addCheckStateListener(new ICheckStateListener() {

@Override
public void checkStateChanged(CheckStateChangedEvent event) {
if(checkboxTableViewer.getCheckedElements().length > 0) {
enableNext = true;
}else {
enableNext = false;
}
checkStatus();

}

private void checkStatus() {
canFlipToNextPage();
//                explicit call
getWizard().getContainer().updateButtons();

}
});

setControl(container);

}

@Override
public IWizardPage getNextPage() {
IWizardPage[] pages = getWizard().getPages();
//        hard coding for this case . But this is bad..
return pages[1];
}

@Override
public boolean canFlipToNextPage() {
return enableNext;
}

@Override
public boolean isPageComplete() {
IWizardPage[] pages = getWizard().getPages();
//        hard coding for this case . But this is bad..
if(enableNext && pages[1].isPageComplete()) {
return true;
}
return false;
}

}
import org.eclipse.jface.wizard.WizardPage;
import org.eclipse.swt.SWT;
import org.eclipse.swt.events.MouseAdapter;
import org.eclipse.swt.events.MouseEvent;
import org.eclipse.swt.layout.GridData;
import org.eclipse.swt.layout.GridLayout;
import org.eclipse.swt.widgets.Button;
import org.eclipse.swt.widgets.Composite;

public class SecondPage extends WizardPage {

private Button button;

protected SecondPage(String pageName) {
super(pageName);
setTitle(pageName);
setPageComplete(false);
}

@Override
public void createControl(Composite arg0) {
Composite container = new Composite(arg0,SWT.NONE);
container.setLayout(new GridLayout());
container.setLayoutData(new GridData(SWT.FILL,SWT.FILL,true,true));

button = new Button(container, SWT.CHECK);
button.setText("check to finish the process");
button.setLayoutData(new GridData(SWT.FILL,SWT.FILL,true,false));

button.addMouseListener(new MouseAdapter() {
@Override
public void mouseDown(MouseEvent e) {
if (button.getSelection()) {
setPageComplete(false);

}else {
setPageComplete(true);
}
}
});

setControl(container);
}

}
Happy Coding.. 🙂
Exploring CDT Programmatically :Part 1 – Creating CDT Project programmatically
In this post we are going to see how we can create a CDT project programmatically. I have divided this into two parts. “UI and Core” parts.
UI:
First, we need a wizard to get the project details from the user. This wizard will serve as the user interface in which user can enter the details like project name, location etc.
We need to create a plugin project. We will name the plugin as com.dld.blog.expcdt.

The above shown is the overview of plugin.xml. The new wizard creation can be done using the extension point org.eclipse.ui.newWizards. Add the following piece of code to your plugin.xml.
<extension
point = "org.eclipse.ui.newWizards">
1 <category
id = "org.eclipse.cdt.ui.newCWizards"
name="C/C++ project">
</category>
<wizard
id = "com.dld.blog.expcdt.mywizard"
name = "New CDT project"
class="com.dld.blog.expcdt.newwizard.CDTCreationWizard"
2 category="org.eclipse.cdt.ui.newCWizards"
3 project="true"
icon="">
<description>Choose to create a new  Project</description>
4<selection class="org.eclipse.core.resources.IResource"/>
</wizard>
We will see what are the numbered sections in the above piece of code .First one is nothing but the category. When we add a wizard we can add it under a category.If we are not using any categories , by default eclipse will add it in the “File->New->Others” category.We can define our own(Customized) category also.Second one is just a follow up of the first one when we are defining our wizard we are defining the category also.
Third one has a important role. If we are not using this then your wizard will not appear in “File->New->Project” category.It will appear only in “File->New->Others” category.So to make your wizard appear directly under “File->New->Project” category you must add this line ‘project=”true” ‘
Fourth one is nothing but the selection source , when we select something in navigator view its nothing but a resource of type file , folder. Our wizard will get enabled for any type of resource selection.
We have to create a class which serves as the wizard.Create a package “com.dld.blog.expcdt.newwizard” and create a class “CDTCreationWizard” the class must extend org.eclipse.jface.wizard.Wizard ,must implement org.eclipse.ui.INewWizard and may implement org.eclipse.jface.operation.IRunnableWithProgress.The class may look similar to what is shown below.
public class CDTCreationWizard extends Wizard implements INewWizard,IRunnableWithProgress {

 public CDTCreationWizard(){
 super();
 }

 @Override
 public void run(IProgressMonitor arg0) throws InvocationTargetException,
 InterruptedException {

 }

 @Override
 public boolean performFinish() {
 return true;
 }

 @Override
 public void init(IWorkbench arg0, IStructuredSelection arg1) {

 }
Now,It’s time to check our UI addition. Right click on plugin.xml->Run As->Eclipse Application. Once the application is launched choose File-New->Project. You will choose a wizard similar as shown below.

You can notice now our wizard is added in.
The next job is to add the wizard page which acts as the page where we add our UI components.
Create a class “CDTWizardPage” it must extend org.eclipse.jface.wizard.WizardPage.This class is going to serve as our UI class.Your wizardpage class may look like this.
public class CDTWizardPage extends WizardPage {

 protected CDTWizardPage(String pageName) {
 super(pageName);
 }

 @Override
 public void createControl(Composite parent) {

 }
}
Now we have to add the wizard page to wizard. The addPages() of wizard will do the job for us. After we add the code the wizardcode may look like this.
public class CDTCreationWizard extends Wizard implements INewWizard,IRunnableWithProgress {

 private CDTWizardPage cdtPage;

 public CDTCreationWizard(){
 super();
 }

 public void addPages(){
 super.addPages();
 cdtPage = new CDTWizardPage("New CDT Project");
 addPage(cdtPage);
 }

 @Override
 public void run(IProgressMonitor arg0) throws InvocationTargetException,
 InterruptedException {

 }
 @Override
 public boolean performFinish() {
 return true;
 }

 @Override
 public void init(IWorkbench arg0, IStructuredSelection arg1) {

 }
We will add now labels and text boxes and a browse button that constitute our wizard page. We will also add the necessary listeners to components.
public class CDTWizardPage extends WizardPage {

 private Button browse;
 private Text prjName;
 private Text locTxt;

 protected CDTWizardPage(String pageName) {
 super(pageName);
 setTitle(pageName);
 setDescription("Creates new CDT Project");
//        setPageComplete(false);
 }

 @Override
 public void createControl(Composite parent) {

 Composite container = new Composite(parent, SWT.NULL);
 container.setBounds(15, 25, 300, 400);

 Label name = new Label(container,SWT.NONE);
 name.setText("Enter the proj name:");
 name.setBounds(50,50,120,27);

 prjName = new Text(container,SWT.BOLD | SWT.BORDER);
 prjName.setBounds(180, 50, 170, 27);

 Label loc = new Label(container,SWT.NONE);
 loc.setText("Enter the location:");
 loc.setBounds(50,90,120,27);

 locTxt = new Text(container,SWT.BOLD | SWT.BORDER);
 locTxt.setBounds(180, 90, 170, 27);

 browse = new Button(container,SWT.NONE);
 browse.setText("Browse");
 browse.setBounds(370, 90, 80, 27);

 addListeners();

 setControl(container);
 }

 private void addListeners() {
 browse.addMouseListener(new MouseListener() {

 @Override
 public void mouseUp(MouseEvent e) {

 }

 @Override
 public void mouseDown(MouseEvent e) {
 DirectoryDialog dirDialog = new DirectoryDialog(browse.getShell());
 dirDialog.setText("Select the parent directory for project");
 String path = dirDialog.open();
 }

 @Override
 public void mouseDoubleClick(MouseEvent e) {

 }

 });
 }

 public String getProjName(){
 return prjName.getText();
 }

 public String getLocation(){
 return locTxt.getText();
 }

}
After adding the above code our wizard page will look like this.

I have added mouselistener to the browse button ,so by clicking the browse you will get a directory dialog.
Now we will modify the wizard code.
public class CDTCreationWizard extends Wizard implements INewWizard,IRunnableWithProgress {

 private CDTWizardPage cdtPage;

 public CDTCreationWizard(){
 super();
 }

 public void addPages(){
 super.addPages();
 cdtPage = new CDTWizardPage("New CDT Project");
 addPage(cdtPage);
 }

 @Override
 public void run(IProgressMonitor arg0) throws InvocationTargetException,
 InterruptedException {
 //Proj creation code should be called here

 }

 @Override
 public boolean performFinish() {
 try {
 getContainer().run(false, true, this);
 } catch (InvocationTargetException e) {
 e.printStackTrace();
 } catch (InterruptedException e) {
 e.printStackTrace();
 }
 return true;
 }

 @Override
 public void init(IWorkbench arg0, IStructuredSelection arg1) {

 }

}
You can notice that inside run method the code which is responsible for creating the CDT project should be called.
Now the UI part is Finished. In the core part we will write a class which does the magic of creating the CDT project. I am naming the class as “CDTProjectManager” ;-).
Add the following code in the CDTProjectManager class.
public class CDTProjectManager {

public void createCDTProj(String pName,String path,IProgressMonitor pMonitor){

IWorkspaceRoot wrkSpaceRoot = ResourcesPlugin.getWorkspace().getRoot();

IProject newProjectHandle = wrkSpaceRoot.getProject(pName);

try {

pMonitor.beginTask("creating CDT Project );

IProjectDescription projDesc = ResourcesPlugin.getWorkspace()

.newProjectDescription(newProjectHandle.getName());

if (!("".equals(path)) && path != null) {

Path myPath = new Path(path);

projDesc.setLocation(myPath);

}

IProject cdtProj = CCorePlugin.getDefault().createCDTProject(

projDesc, newProjectHandle, pMonitor);

}catch(Exception e){

e.printStackTrace()

}

}

}
Now include the below shown code in the run method of wizard.
public void run(IProgressMonitor arg0) throws InvocationTargetException,InterruptedException {

new CDTProjectManager().createCDTProj(cdtPage.getProjName(),cdtPage.getLocation(),arg0);

}
That’s it. We are finished now. 🙂
Exploring CDT – Programmatically
From last couple of months I am working on eclipse CDT platform. It’s quite new to me since I haven’t worked on CDT before and I am familiar with only JDT.It’s good that you always learn new things.. J and that too based on my favorite platform eclipse.
CDT is nothing but the C/C++ developer platform built on top of eclipse.It provides lots of functionalities like project creation , managed build , managing toolchains etc.,To know more about CDT you can refer here.
We will see the basic flow how a cdt project is created and launched.
Once you create a new C/C++ project , you will create all your folders and as good practice you will keep all your source files in src/ folder and all the header files in inc/ folder.
You need to do some project settings which can be done here your project – > properties->C/C++ Build ->Settings. Here you will set all the tool chains settings and build artifact settings. In project – > properties->C/C++ General->Paths and Symbols, you will set all your macros and libraries.
By default CDT has two configurations namely “Debug” and “Release”. At any point of time only one config will be active.After all this done you will launch C/C++ application. All the source and header files are being compiled using the tool chain you have set and they will be converted into object files and at last they are bundled as an exe and eclipse will launch that exe when you choose Launch C/C++ application in the Navigator/Project explorer context menu.
You can see the created exe in navigator view under the folder which is named as per the configuration used.
In further posts I am going to discuss how we can build a CDT project , set the macros , libs etc., programmatically.I will also share my explorations on eclipse cdt 😉
Understanding basic concepts in eclipse
In my earlier post i have introduced you to eclipse.Now, before we start using eclipse api’s we need to understand some very basic key concepts in eclipse architecture.In this post i am going to have a walk through of the basic key concepts in eclipse plugin architecture.
Plugin:
The first and the most basic thing of eclipse is nothing but a plugin. A plugin is nothing but an individual runnable component which may be plugged into or may have pluggable components for another runnable component to get plugged in for running it.For more detailed reference you can refer here.
A simple plugin.xml will look as shown below.
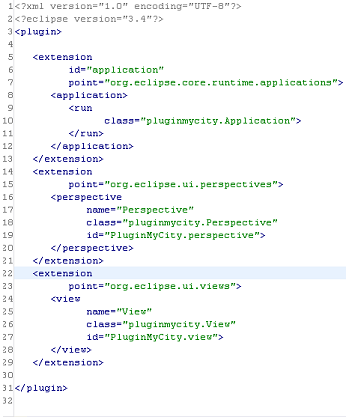
In the above shown plugin.xml , it defines a perspective and a view which are there in the plugin. You can notice here that the terms extension point and extension is mentioned in the file. The next thing we are going to see is about extension and extension points.
Extension & Extension Points:
The next basic things in eclipse are nothing but extension and extension points.
An extension is nothing but a pluggable component defined in a plugin.In real life scenario you can imagine an extension as a memory card. So to read a memory card you need a card reader, right?
the card reader slot is nothing but the extension point. An extension point defines some rules (as there in real life scenarios) for it and whichever extensions which are having compliance to those rules can be plugged in to it. Extension and extension points is the basic way of how pulgins are interacting between each other. So you can understand from here that the “extensions” have the functionality written in them, if any other plugin wants to use the similar functionality it can be plugged into it and can be used.
In the above plugin.xml shown it uses two extensions
1) org.eclipse.ui.perspectives
2) org.eclipse.ui.views
LifeCycle of a plugin:
The Life cycle of a plugin is controlled by a class called “Activator.java” which will be created by eclipse itself when a plugin is created. A sample activator class will look look this.

The start method is called whenever the plugin is getting loaded.
When does a plugin gets started?
Eclipse by default follows lazy loading concept, i.e a plugin will be loaded only if one of its class is getting called. We can override this lazy loading option also so that the plugin gets loaded whenever your application is loaded.
There are three scenarios a plugin will be activated.
- If your plugin has an executable extension, and if another plugin is using/running it, that time your plugin will be automatically loaded.
- If your plugin exports any of its libraries (JAR files), another plugin can reference and instantiate your plugin classes directly. Loading a class belonging to your plugin causes it to be started automatically.
- A plugin can be activated explicitly, using the API method Platform.getPlugin(). This method returns a fully initialized plugin instance.
For more details please refer here.

